Thursday, July 30, 2009

Possibly the cutest thing *EVER*

Yesterday I got a birthday present a week or two early, the kind of gift you give yourself because you simply can't resist.

It may well be the cutest set of knitting stitch markers in existence.

There's a friendly lady in Hawaii who fashions these exquisite tiny sculptures out of polymer clay, attaches them to stitch marker hardware, and sells them on Etsy under the trade name Wee Ones. She calls them "little companions for life," and they are even more amazing in person than they appear in photographs. Incredible attention to detail!! Click on the image above to take a closer look.

As a bunny owner, I knew the instant I saw them that I had to adopt the whole miniature warren.

By the way, that's a US size 0 (2.0 mm) double-pointed needle that they're hanging from, for scale.

I'm going to attach one of them to Stornoway, so that every time I come full-circle, I'll have a darling little friend waiting to greet me. *Delightful*.

Peggy Tudor: Our Little Girl Is Growing Up

The third Peggy Tudor panel is now complete!! It took quite a bit longer than the first two, partly because it's at least twice as large and also because I got a bit distracted with other projects (the Fjörgyns, Stornoway, entrelac, etc.). Note the pattern at the side-seam (previously seen only in the swatches). I love the way it echoes the undulating curve from the edge of the thistle panel. Click on either image for a closer look.

Three down, thirteen to go...

Entrelac -- Entre*LICIOUS*

The Spring Bouquet sweater is complete!! This took some doing, let me tell you...

First of all, I washed the pieces before sewing, which was a great idea, in that it smoothed out all the edges and made the seams incredibly easy to do.

But the instant the entrelac fabric got wet, it flattened out like a PANCAKE. All the wrinkles and textured contours simply vanished!!

And the flattened fabric was noticeably bigger... The chest circumference of the finished garment measured 44", with a length from the shoulder of 30". Some spots, especially at the joins between entrelac segments, were undeniably see-through as well. It's a thick-and-thin yarn, after all. (Click on the image to get a closer look.)

Not good. I simply *HAD* to shrink it. Time for a hot-water bath.

I cannot let this moment go by without saying that I am struck by the way things come in threes. Before this summer, I had never intentionally shrunk or felted a sweater before, and now I have done it three times in the last several weeks. At least the success with the two Fjörgyn coats gave me confidence with the entrelac. I might have freaked out otherwise, but as it was I stayed remarkably calm throughout this whole process.

The sweater went through one washer cycle on hot with a short soak in the middle. I had placed it in a mesh laundry bag to protect it, but some parts still felted quite a bit, especially where the folded sleeves rubbed against the yoke. There's not much surprise in this, though, given the incredible softness of the wool. It was bound to felt somewhat when washed, even with gentle treatment.

It shrank exactly as I had hoped, to a chest circumference of 42" and a length of 26" from the shoulder. The sleeves were always on the narrow side, but I have short arms, and they fit perfectly.

The only real problem was the neck, because the ribbing of the collar did not shrink nearly as much as the surrounding fabric.

This resulted in a cowl that stood up about 2 1/2" away from my neck all the way around. (Click for a closer look.)

I *really* wanted a proper turtleneck, so there was nothing for it but to redo the collar.

Fortunately, I was able to rip out more than half of it and reuse the yarn. But the bottom part had felted almost completely, so I finally had to cut it off with scissors. Talk about nerve-wracking!! Careful, careful...

Once the neckline was clear, I used a pointy Addi lace needle to pick up stitches again (only 100 of them this time, instead of 116) and then proceeded to knit a new collar with a US size 5, instead of a 7, to ensure that the result would fit snugly.

Finally, I washed the whole thing again — in COLD water this time, to avoid any further shrinkage — and pinned it out to dry.

Some parts of the sweater are still more solidly felted than others, but the fabric has a uniformly soft texture. Here are some pictures of the finished product, which I will wear proudly and often, once the weather cools down. As always, click on any one of the images to get a closer look.

The more I look at this sweater in its finished form, the more I *LOVE* what the washing did to smooth out all the color changes. It looks muted and dreamy, just like an Impressionist painting. :-)

Sunday, July 26, 2009

Fabulous Fjörgyn, Burgundy Bliss

Today I finally sewed the buttons on my burgundy Fjörgyn coat. They're the same yummy walnut buttons that I used for my husband's version, and were purchased online from Camilla Valley Farm in Ontario.

The Icelandic wool fabric is so dense — especially after its hot water wash — that it took a full three days to dry. But now it's all done!!! And I feel fabulous about the way it turned out, especially the fit. It's ample enough to be like a wearable blanket (which will be wonderful in the depths of winter, when my husband will want to turn the thermostat way down), but not overwhelming because I scaled it down to suit my stature, especially in the sleeves. I also love the rich heather, which has tiny flecks of orange and and green and turquoise against the deep burgundy background. It reminds me of pinot noir.

Here are some pictures of the finished product. As always, click on any one of them to get a closer look...


Thursday, July 23, 2009

Stornoway: 1st look

It's always fun to unveil a new WIP, so here goes...

As of today, I have finished the ribbing and the first 25 pattern rows for the body of Stornoway (my husband's guernsey), made with Frangipani 5-ply guernsey yarn on 2.5 mm (US size 1+) needles. The pattern is shaping up nicely. It feels *wonderful* to the hand and the stitch definition is fabulous.

Here are the first official pictures. As always, just click on either one to get a closer view.

Stay tuned. There will be good news to report on the entrelac front very soon, perhaps even later today...

Wednesday, July 22, 2009

Laundry Day

Today is is a day for soap & water, bringing me closer to the finish line for two major knitting projects that I am eager to complete: the burgundy Fjörgyn coat (which is all sewn together & ready for a gentle shrinking/felting) and the Spring Bouquet entrelac turtleneck (the sleeves of which are now complete and ready to be washed & pinned out carefully, along with the front & back, prior to sewing).

Here are the pre-wash photos. Click on either one for a closer look...


Saturday, July 18, 2009

Two Milestones

I was a bit surprised to discover just now that an entire *week* has gone by since my last post. I guess I have been doing more knitting than typing lately, and in the past few days the lighting was not good for photographs either. But I got some pictures in this morning, and there is now happy progress to report.

I have finished the knitting for my burgundy Fjörgyn coat. The sleeves, button plackets, and collar are all complete, so it is all done except for the sewing. LOTS of sewing, but that's another story... Here is a picture of the sleeves, which I modified to make them narrower (in keeping with my decidedly un-Walkyre-like stature) and shorter. Click for a larger view.

I also finished the front & back for the Spring Bouquet entrelac. It is shaping up really well. Here are wide shots and closeups of both pieces. Click any one of the four for a closer look.

These two sweaters have been lots of fun to knit, but I'll still be very happy to have them both done before August arrives with all of its back-to-school fury, not to mention the other projects (like the Great Guernsey Adventure) that are waiting in the wings...

Saturday, July 11, 2009

Gauging the Guernseys, Part II

P.S. I decided that it made sense to finish all the necessary Guernsey swatches in a single whoosh this afternoon, partly so that I would not have to pause when the time comes to launch Eriskay, but mainly so that I can place only *one* order for circular needles in various missing sizes & lengths. Fortunately, all it took was one additional swatch: with 2.25 mm needles, I got 15.5 st & 21 rows in 5 cm, which will happily account for the necessary 31 st and 43 rows in 10 cm. Now to order those needles and cast on for Stornoway. Teeheee!!!

Gauging the Guernseys, Part I


After 3 swatches, I am now ready to cast on for Stornoway. Here are the gauge results (from top to bottom):

3 mm needles = 13.5 st & 17.5 rows in 5 cm
2.75 mm needles = 14.5 st & 18 rows in 5 cm
2.5 mm needles = 15 st & 18 rows in 5 cm.
Since that 3rd result is precisely the required gauge, we're officially good to go. I'm happy too, because the 2.5 mm needles felt the most comfortable with the yarn.

Eriskay will probably need at least one needle size smaller, because of its smaller row gauge (21 rows in 5 cm) — but that's a problem to be solved another day.

It's been a while since I last made a sweater in-the-round. This is going to be *FUN*...

Christmas in July

Happiness is bundles of yarn, delivered right to your doorstep. It really feels like Christmas, even if I did have to pay...

With the arrival of this morning's mail, I became the proud possessor of 5 cones (yes, CONES!!) of traditional 5-ply Guernsey wool from Frangipani in the UK.

We're looking at another His & Hers project here, involving a pair of designs from Alice Starmore's Fishermen's Sweaters book. The deep burgundy colorway is called "Damson" and will become Eriskay for me. The lovely gray-green is called "Cedar" and will become Stornoway for him.

And so the Great Guernsey Adventure begins. I will be swatching this afternoon...

Wednesday, July 8, 2009

Enchanting Entrelac

Entrelac, I have decided, can be dangerous.

It is highly addictive, quickly induces a trance-like state in the knitter, and because of the intertwined rows, has no obvious "stopping places." It is WAY too easy (as with potato chips or "Crunch & Munch" or certain controlled substances), to keep saying, Just one more, & then I'll quit...

Recently, in the course of one particularly susceptible 24-hour period with a lot of NCIS in the background, I managed to complete the first cycle through all 9 skeins on both the front and the back, and then to start the second one. When I finally came out of the daze & looked down at what I had accomplished, I was more than a little bit stunned at how far I had come.

Here are the results. As before, the notional "back" is on the left, and the "front" on the right. They are starting to look like real sweater pieces now! Click on either image to get a closer look.

The palest ivory skein (#6) and the one with the heaviest concentration of light blue (#8) both stand out from the rest as much as I knew they inevitably would, but I am still quite pleased with the blend overall. To help things along, I think I will start the sleeves with skein #7, so that the relatively dark band now appearing around the upper chest will have an echo at the cuffs. That will unify the look of the sweater as a whole. Since skein #1, which did the ribbing for both front & back, is also running low, I will be glad to restrict its use on the sleeves to a relatively narrow band slightly above the ribbing.

Happy knitting!!

Monday, July 6, 2009

Fjörgyn: once more with felting (er, *feeling*)

There is an old math joke of which I am extremely fond, that runs like this: 2 + 2 = *5* (for exceptionally large values of 2).

A similar logic would suit the "one size fits all" designation for Elsebeth Lavold's cabled Icelandic wool sweater-coat that goes by the name of Fjörgyn, after the Norse Earth goddess who is mother to Thor. Sure, one size fits all, if you (re)define "all" narrowly enough. In this case, only card-carrying Walkyrie need apply.

[[ Anyone who enjoyed the After Dark screensavers as much as I did will understand why my imagination is full of flying toasters right about now. ]]

Copyright rules prohibit me from reproducing the original photo from the pattern book, but suffice to say that the model is a tall Nordic beauty whose friendly smile masks a physique that no legendary warrior maiden could possibly despise.

In other words, the sweater is HUGE. The pattern specifies finished garment measurements of a 51" chest and a 33" length from the shoulder.

So when I set out roughly 2 years ago to create His & Hers sweaters for my husband & myself using this design, I knew that I faced a challenge. For we are by no means the same size. But neither one of us could ever be mistaken for a Walkyre either, even at 50 ft. away in the densest imaginable fog.

At any rate, I decided to make his sweater first, since he is larger than I am, which meant that I could stick relatively closely to the original design. It made sense to wait with mine until I had been through the pattern once and become more familiar with it, so that I could figure out how to modify it to fit me.

I finished knitting his sweater in time for Christmas of 2007. Here is what it looked like (click for a larger view).

Unfortunately, it soon went into hibernation as an unfinished & unsatisfactory knitting project rather than into his closet as a functional garment, because it plainly still needed more work: (a) the hood was the wrong shape, because it stuck out at the back & deprived him of peripheral vision, (b) the sleeves were about 3" too long, and (c) the whole thing was just WAY too big and floppy in general. I would have to shrink the sweater and/or modify the pattern somewhat before he could ever wear it.

At that point I laid it aside, not ready to face it again just yet, or even quite sure what to do, & there it sat. And sat. And sat — until a few days ago when I finally dragged it out & made him try it on again, so that I could assess the situation anew and come up with a workable game-plan. If at all possible, I really wanted to lay this project to rest before the end of the summer.

Reshaping the hood held every promise of posing a design challenge, but to my surprise and delight, my husband announced that he would actually prefer a high rolled rib collar instead. Easy!!

Meanwhile I had read on Ravelry about several people who had been driven to use hot water in the washing machine — gentle felting, really — to make the over-sized proportions of this sweater work for them, and that knowledge emboldened me to tackle my own problem with confidence.

As it turned out, I was able to complete the switch from hood to collar in a single day. The first step was to rip out the existing hood and button plackets (which had been knitted all of-a-piece), winding the yarn as I went. Then I picked up the reserved stitches from around the neckline again onto a flexible circular needle and knitted 8" of k2p2 ribbing, so that the finished collar would measure roughly 3 1/2" high when the edge had been rolled over & sewn in place. After that new button plackets were quickly knitted separately down either side of the front, which had the added benefit of creating a convenient gap at the throat, so that the bulky collar would never threaten to strangle the wearer.

The real moment of truth arrived the next day, as I carted the newly (re)finished sweater off to the laundry room for a hot-water wash. I had calculated that it needed to be shrunk all over by approximately 10%. But it was important that the fabric not be so thoroughly felted as to obscure the lovely intricate cable design on the front & sleeves (shown here before washing).

Soaking wool in HOT water went against every instinct that I possess, but it worked like a charm. Two delicate wash cycles on hot, and one rinse on cold, were sufficient to achieve the desired result. After confirming that the measurements were right, I got out my drying rack & let the sweater dry flat.

Happy ending. It now fits him perfectly, and the slightly felted fabric feels very substantial & cozy. The best part is that the cables are still entirely visible, although their outlines are fuzzier & more muted than before.

The finishing touch was to sew on the lovely walnut buttons that I had purchased on-line from a retailer in Canada.

Here are some pictures of the finished product. As usual, click on any one of the images for a larger view.

I am especially pleased with the collar. In fact, I like the idea so much that I now intend to adopt it for my own burgundy Fjörgyn, which is back on the "active duty" list again, after many months of hibernation alongside its blue counterpart

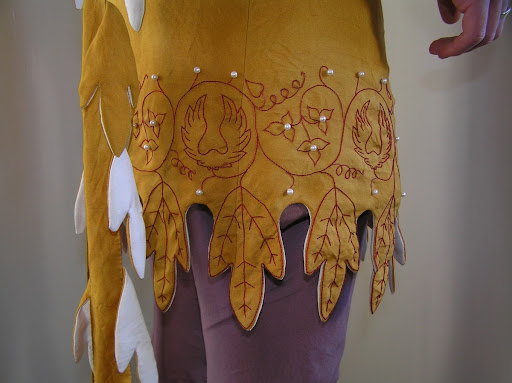
The two pieces of the front (shown here in this "teaser" photo) were completed last fall, and I have just begun the back, with the addition of a cable panel running up & down the center to match the front (the original pattern calls for straight stockinette).

I feel energized & enthused about this project again, now that the sweater for him has turned out so successfully at long last. I want to have both of them finished before the snow flies. More to come as "Fjörgyn burgundy" progresses...

Saturday, July 4, 2009

Of "Dagging" & "Slashing"

Dagging & slashing. They sound like primitive combat tactics, don't they?

But these terms are not meant to invoke either violence or bloodshed. For they refer to two fancy tailoring techniques that became popular in Europe from the 14th to the 16th centuries for the embellishment of elegant garments.

Dagging is a decorative hem created by pointed motifs, or dagges, that are cut into the edge of a sleeve or the bottom of a blouse or tunic. These could be simple U or V shapes or sometimes more complex designs.

Slashing (also known as "slash-fabric" or "faux chenille") is when multiple layers of contrasting fabric are sewn together and the upper layers artfully sliced open to reveal the colors beneath. The story is told that the technique originated when certain soldiers of the Swiss army sought to keep warm by cutting scraps of material from tents & banners and stuffing them into the chilly holes in their clothing. Upon their return home, the colorful effect of this act of desperation sparked a whole new fashion trend!


Whence comes this sudden interest in tailoring techniques from so long ago? Note the following remark from the pattern notes, explaining the unusual design of the Margaret Tudor sweater:

Slashing is a sophisticated facet of the tailor's art that became extremely fashionable throughout Europe in the 1500s. I have transferred the concept to knitting, together with the strong emblems of The Thistle and The Rose.

So that is why the pattern consists of many individual narrow strips that must then be carefully sewn together. The undulating edges of the thistle panels are designed to overlap the rose panels in such a way as to create "windows" or frames that display the openwork underneath.

As the photo shows, I finished the second thistle panel yesterday. It will be the center front. Notice that unlike the back it ends with a complete motif at the top.

Since the front and the back each have two rose panels flanking the center, and the sleeves each have one down the middle, these first two thistle panels are the only ones with the undulating edges on both sides. The remaining ones will all have that pattern on one side, with the garment shaping of sleeve edge or armhole on the other.

Thursday, July 2, 2009

Defying Gravity

It's uncanny. Call it a Law of Nature. Certain things *ALWAYS* seem to happen, no matter what I do.

When cutting out a new sewing project, for instance, at some point I will inevitably spill my box of pins.

When hand sewing, at some point I will inevitably drop my needle in a random direction and have to hunt all over for it.

And when knitting cables, I will inevitably keep losing track of the @#%&^!! cable needle.

I have been known to slip cable stitches off the needles into mid-air and perform the twists manually, just in order to avoid having to use, and more to the point keep track of, a cable needle.

It's become sort of a sad joke in my life, really.

Things like this bring out my native Slavic fatalism in a big way. You know what I mean: you're not paranoid, those really ARE German Panzer units on the horizon...

Peggy Tudor has some delicate cable work that requires careful attention, and the assistance of a cable needle can be invaluable. So lately, in connection with the thistle panels, I have frequently had to stop & grope around next to me and/or UNDER me, because the silly thing has slipped away & made another bid for freedom.

I have tried all of the obvious fixes, like sticking it in my knitting, or in the skein, or on my lap, or in my mouth. None of them seem to help.

Frustrating doesn't even begin to touch this.

So I was complaining about it last week at that gathering of knitters in Louisville, where the entrelac concept for my Spring Bouquet yarn got its big vote of confidence. The ladies made various creative suggestions, and I admit I was rather dubious at first.

But yesterday, after tracking down the elusive cable needle for the third time in approximately 11 minutes, I finally decided that enough was enough and put one of the ideas to use.

I got some stray bulky yarn out of my stash, and knitted a small seed-stitch rectangle, just the right size to hold the cable needle securely, so that I can pin this object to a convenient spot on my clothing while I am knitting and always have it to hand.

I am happy to report that this embarrassingly simple solution works like an absolute charm. It has *SOLVED* my perennial problem. Gravity is no longer a predatory influence on my cable knitting.

Take that, Isaac Newton!!

Wednesday, July 1, 2009

Peggy Tudor: 1st whole panel

Last night I finally finished the first panel for Peggy Tudor!!

Here it is.

One down, and "only" 15 more to go.

That's 5 each front and back, plus 3 for each sleeve.

So this is just the first big milestone.

I've got some *serious* knitting ahead of me.

But it's lots of fun (even if the pattern requires a bit of concentration).

This will be the center back.

As you can see, there's a partial motif at the top (18 out of 44 rows).

That's in order to allow the center *front* to end on a complete thistle at the neckline.

So this panel consists of (5 x 44) + 18 = 238 rows.

It is a long skinny panel.

I love the elegantly undulating edges with their touch of lace.

They will become a striking feature of the finished sweater.

Of course, what I have here is a LONG SKINNY PICTURE to mark the occasion.

Hence the short, choppy paragraphs, because I needed to fill the space.

TA-DAAAH!!